How to Create AMP Email Templates
Learn more about how to create highly interactive and user-centered emails with AMP email templates.

AMP (Accelerated Mobile Pages) is an open-source HTML framework combining HTML, CSS, and JavaScript. It was originally created by Google in 2015 for mobile webpages. I'm not going to quote an article from Wikipedia and the official site AMP.DEV. The most important thing is that now we can use AMP in emails. It provides us with a great opportunity to use highly interactive elements directly in email templates without asking our users to visit landing pages on the websites.
Unfortunately, this technology is new, and it is supported by a very limited list of email systems: Gmail, Outlook.com, and Mail.Ru to name a few. Yahoo Mail announced that it will enable AMP powered emails soon.
09/18/2020 UPDATE: Outlook.com, who has worked with this technology, announced that from October 1, 2020, it will stop supporting AMP emails.
The second problem is that the mail systems listed above don't display AMP content by default. You have to register each email campaign sending special requests. Read how to do it in our next articles. This post is about how to create your first AMP email template. If you still want to work with AMP, you’re welcome to read this guide.
How to receive test AMP email in Gmail and Outlook.com
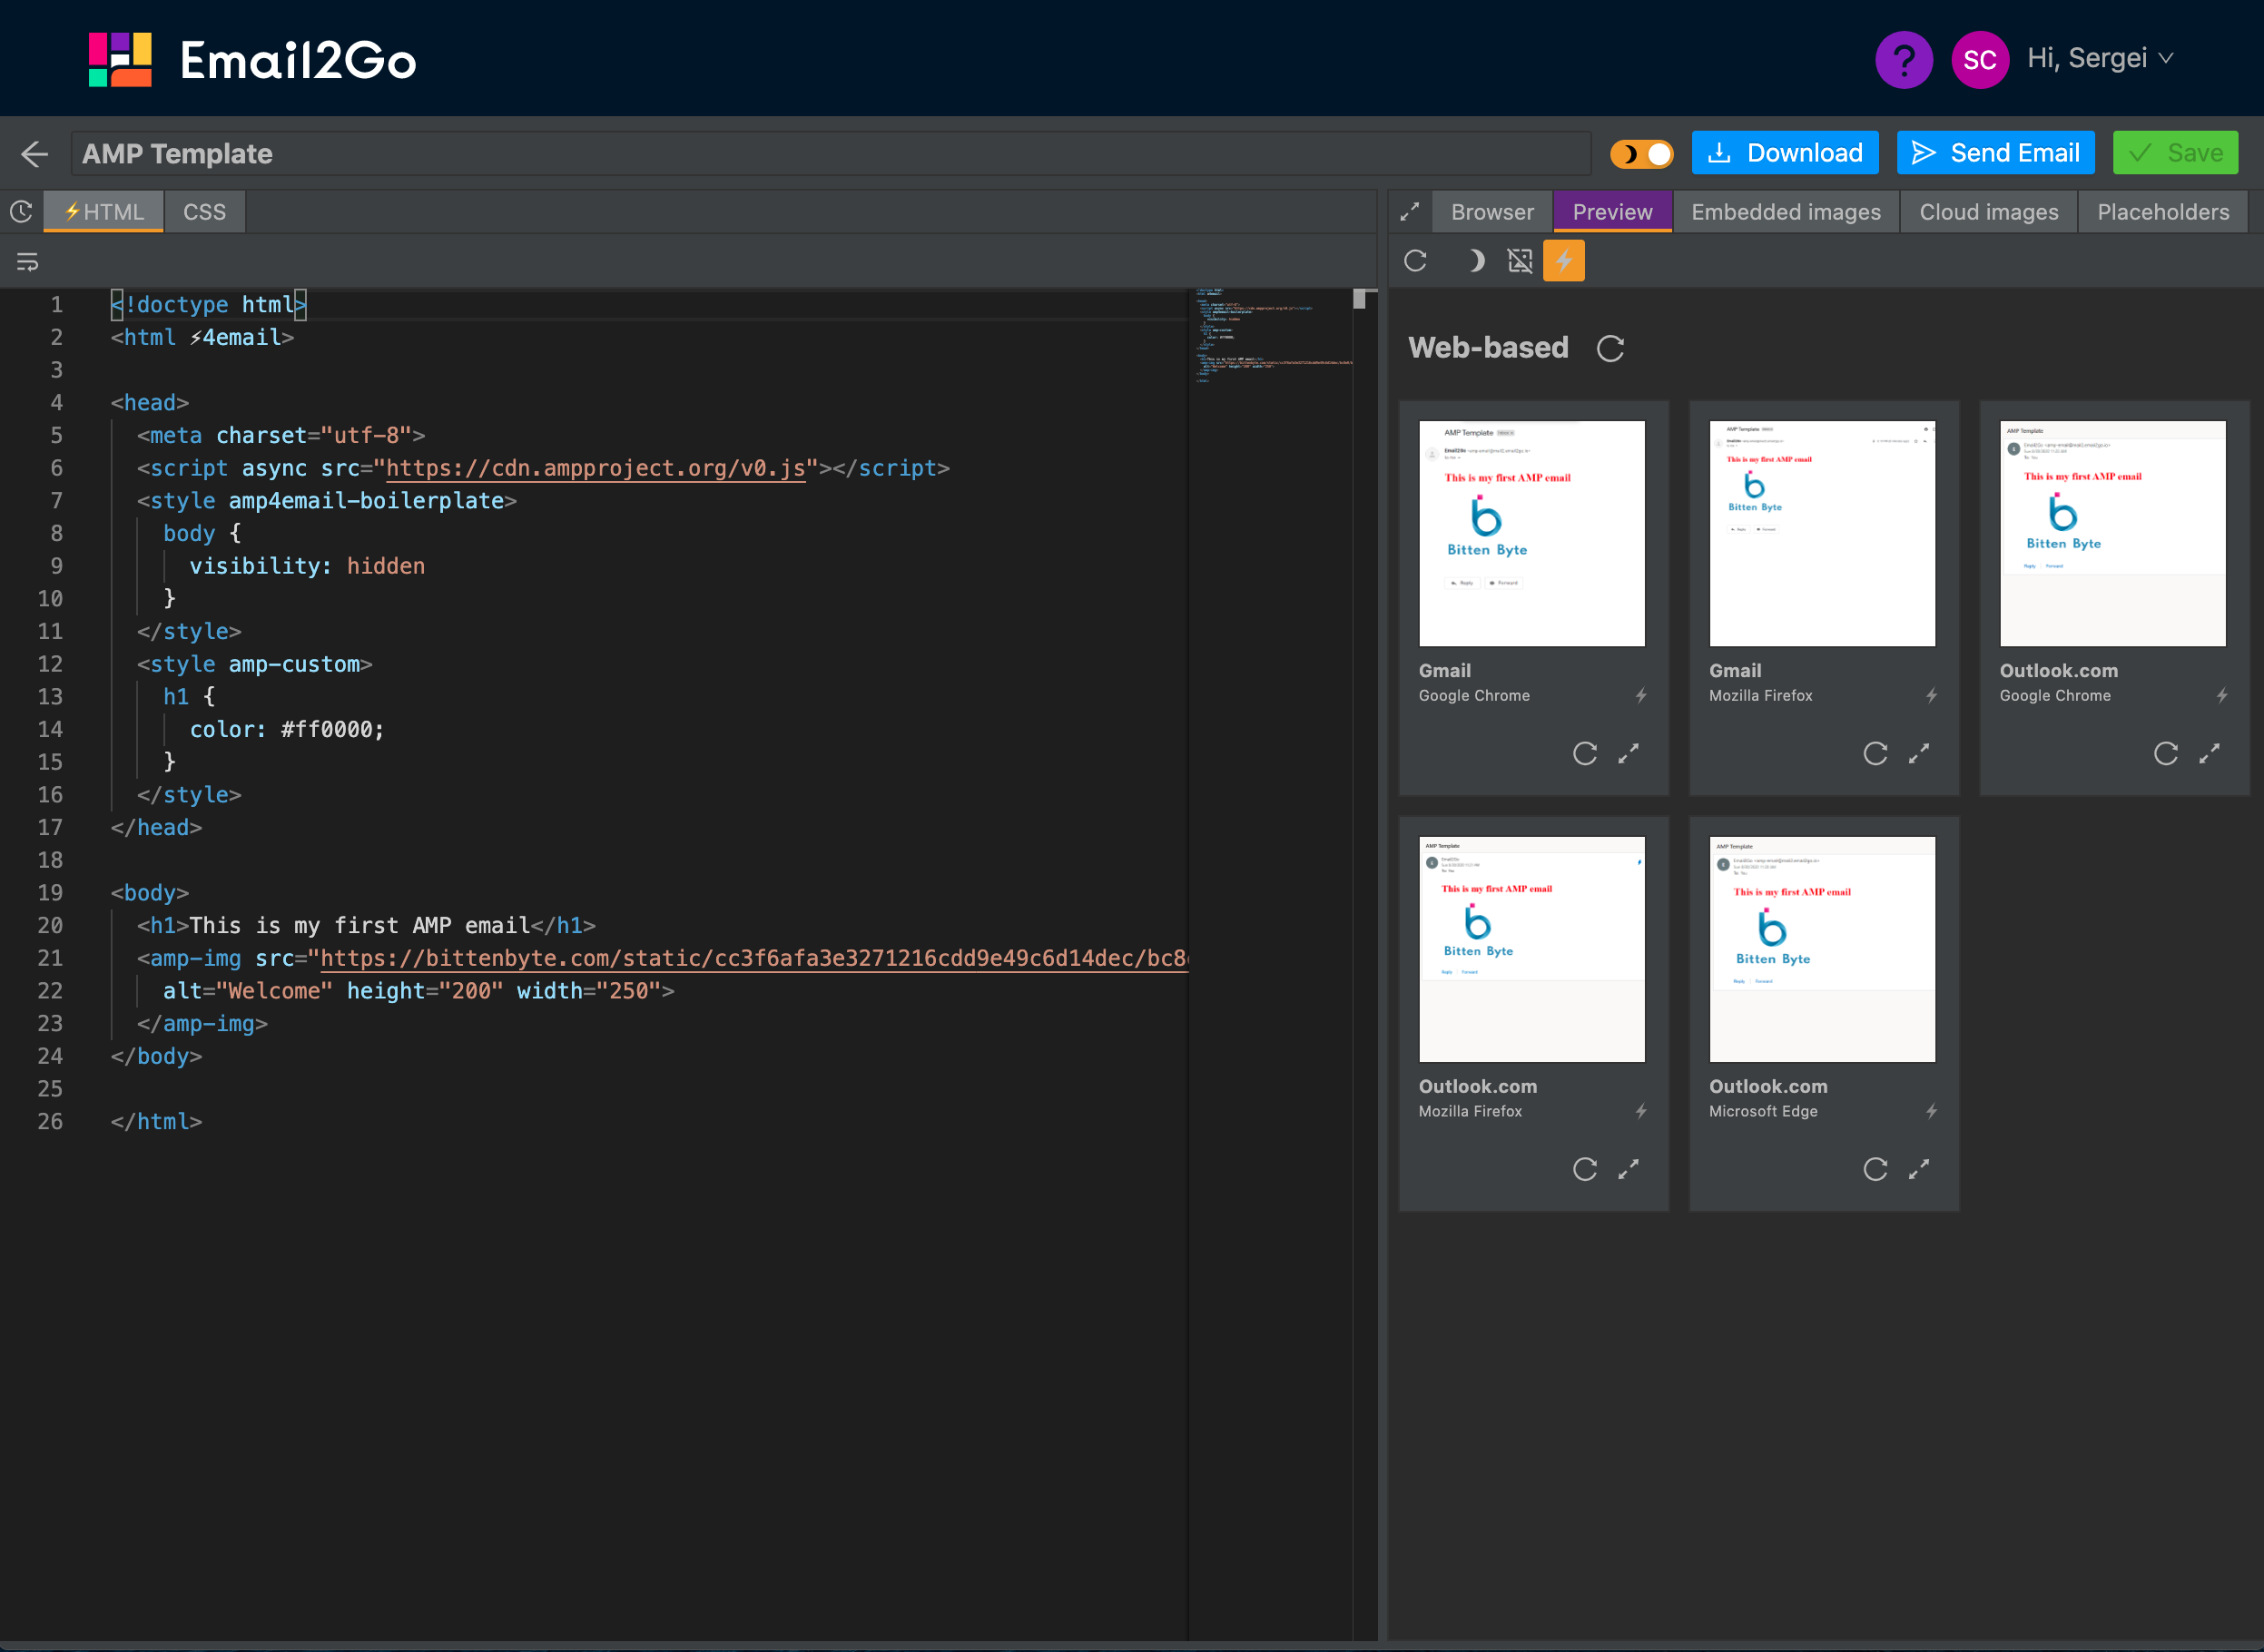
As I said before Gmail and Outlook.com don't display AMP emails by default. But how can we check out AMP templates before we finish working on them? I have great news – Email2Go completely supports AMP and it is an excellent email testing platform, which includes AMP emails. You can see how your AMP templates look at the “Preview” tab of the free email template builder.
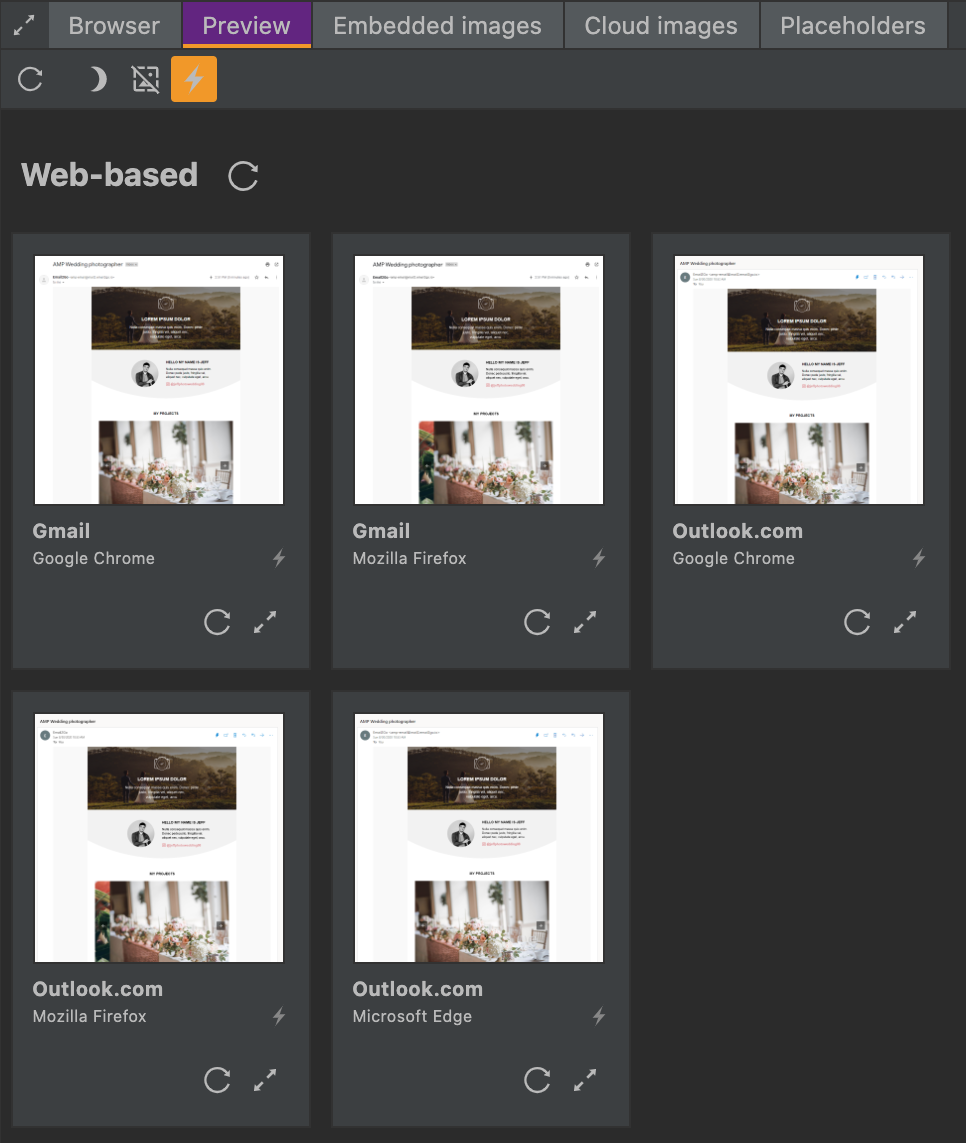 Testing AMP templates in Email2Go
If you want to test interactive elements in your template, you can send it to your personal email address at Gmail or Outlook.com using the “Send Email” button. Before that, you need to allow displaying AMP emails from the Email2Go email address: noreply@test.email2go.io.
Turning on AMP in Gmail
So, let's allow Gmail to show AMP emails from Email2Go.
1. Go to your Gmail Settings > General > Dynamic email. It’s enabled by default, but it is better to doublecheck. This feature is available only for email addresses within the gmail.com domain.
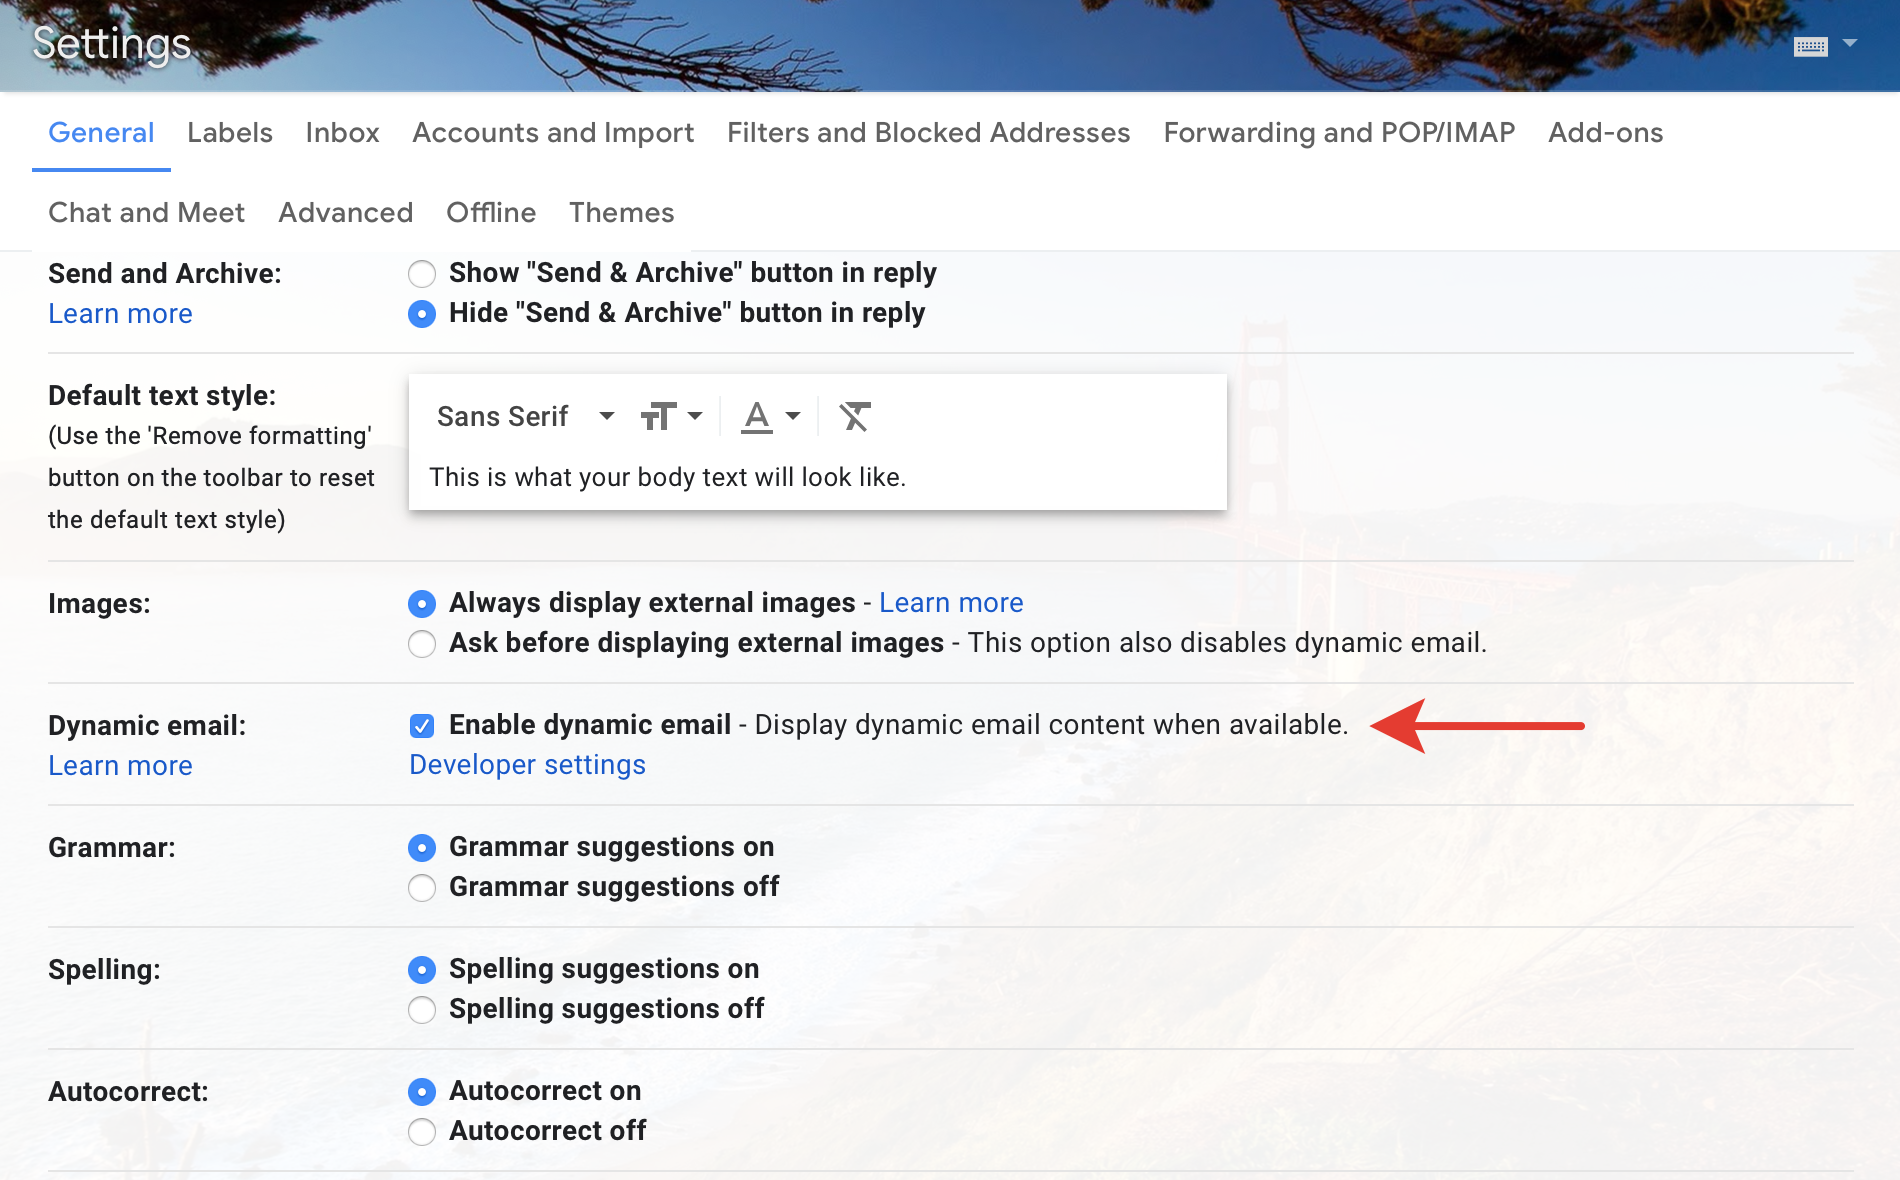
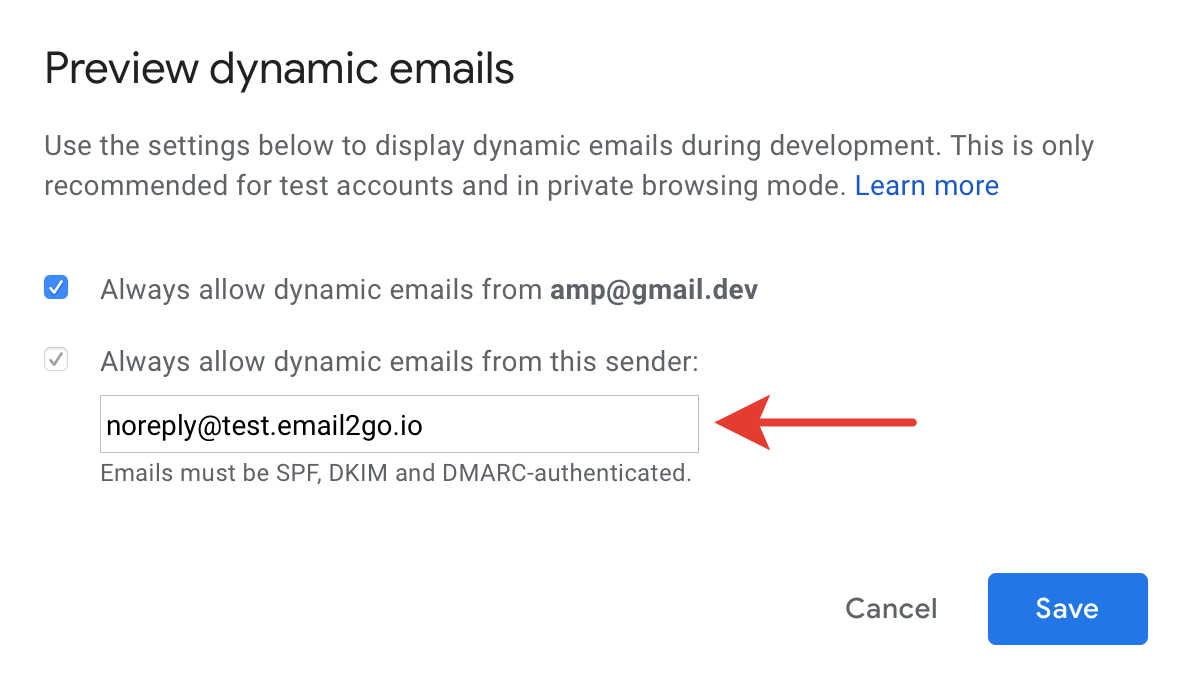
2. Click Developer settings and specify the sender's email from which test dynamic emails would be allowed. The email for Email2Go is noreply@test.email2go.io.
It was easy. Let's do the same in Outlook.com.
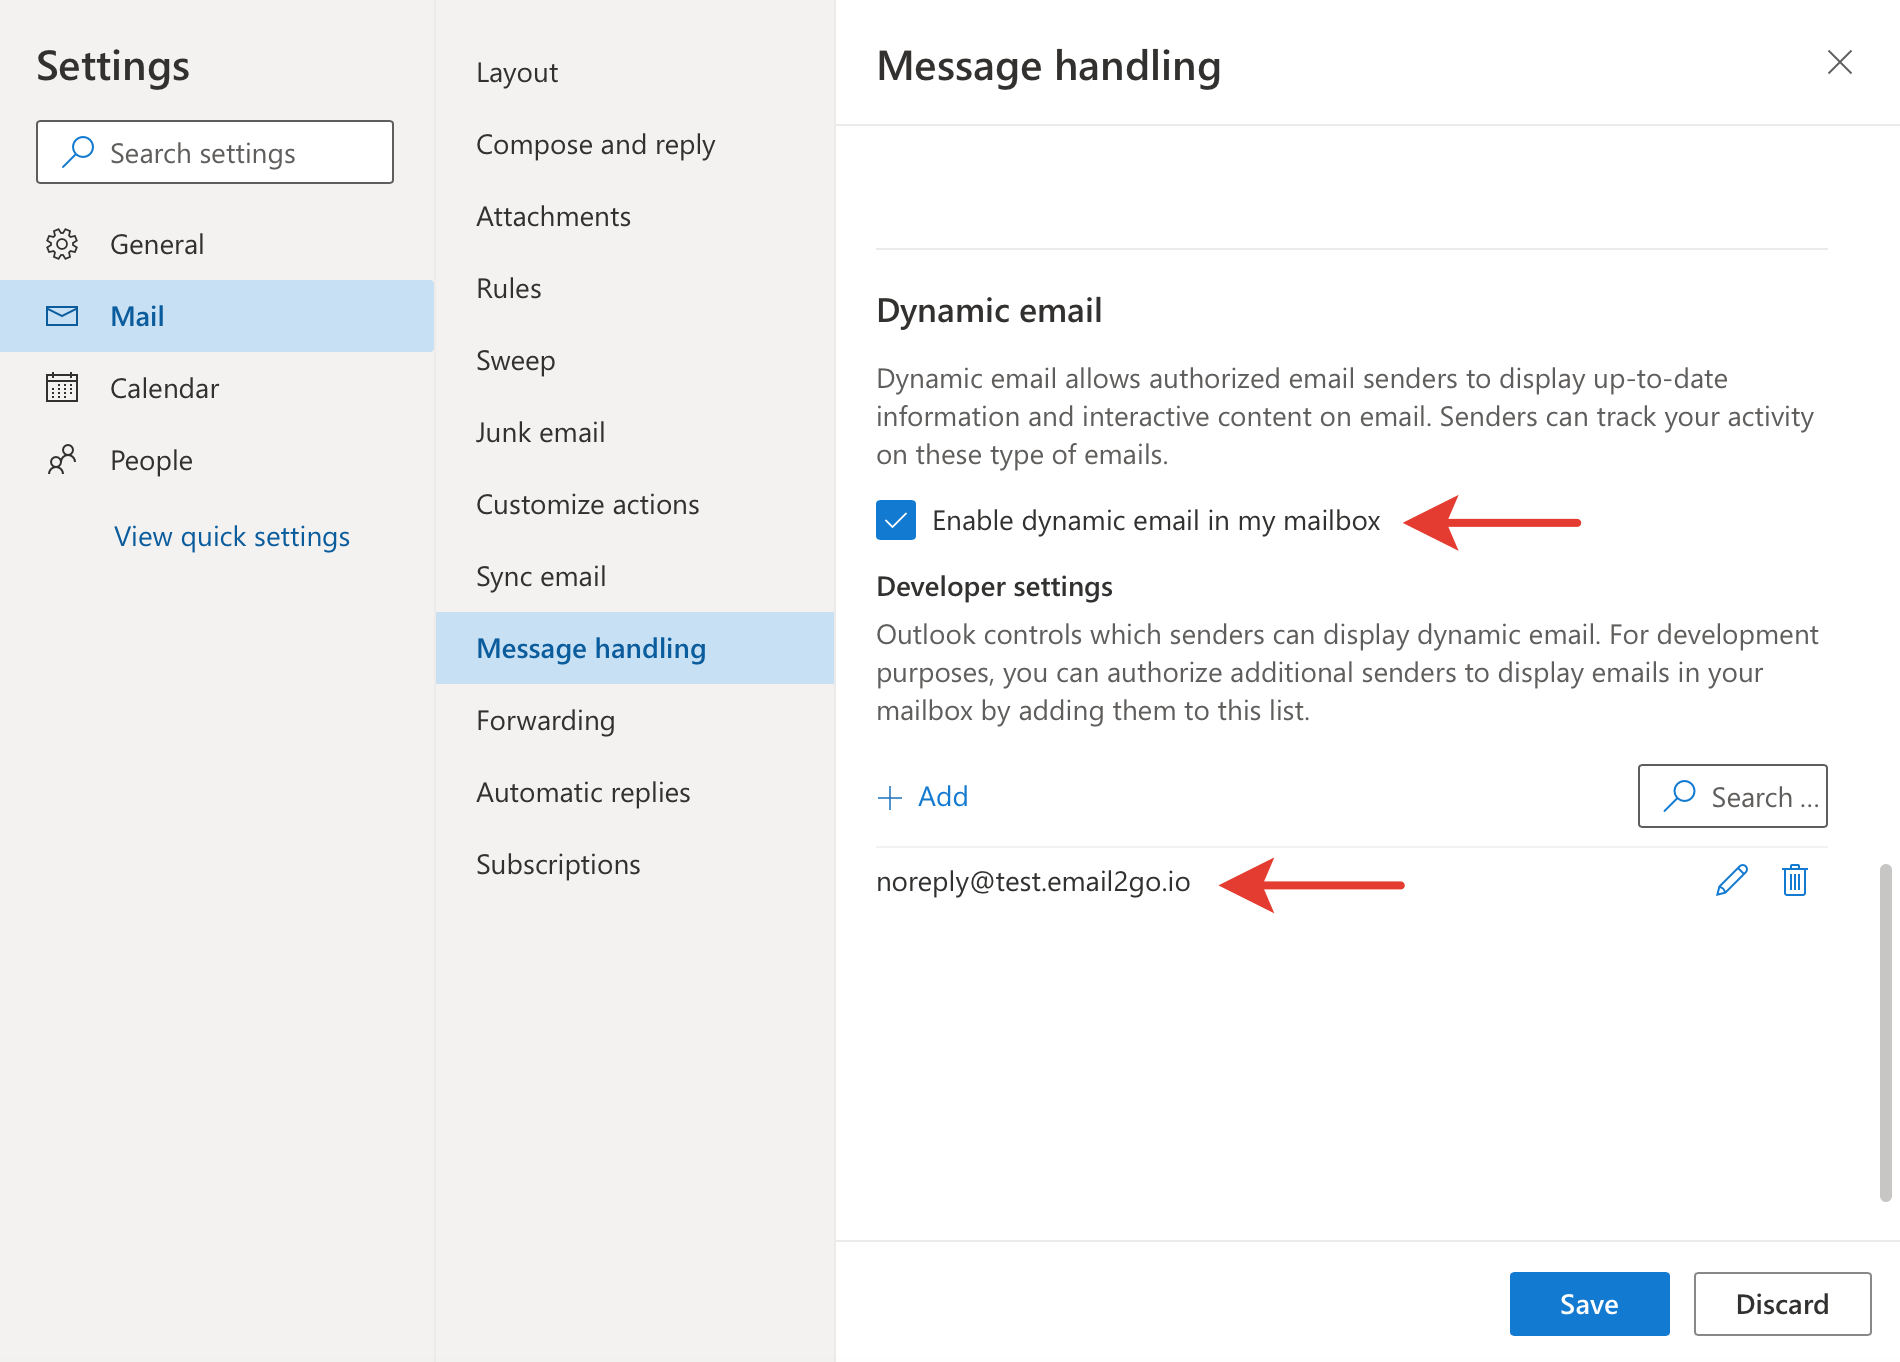
Turning on AMP in Outlook.com
09/18/2020 UPDATE: Outlook.com, who has worked with this technology, announced that from October 1, 2020, it will stop supporting AMP emails.
1. Go to your Outlook.com Settings > View all Outlook settings > Mail > Message handling
2. Scroll down to the Dynamic email section and check on "Enable dynamic email in my mailbox." Then click "Add" and input noreply@test.email2go.io in the appeared field. Don't forget to press “Enter” to be sure you added the email address.
Congratulations! We finished all our preparations. Now we can start developing our first AMP email template.
Creating AMP email templates
First of all, we have to know what turns a regular HTML template to AMP. There are some requirements and restrictions:
- AMP emails must identify themselves as such by including
⚡4email, oramp4email, in the html tag. - The
<head>tag must also contain a<script>tag that loads the AMP runtime.<script async src="https://cdn.ampproject.org/v0.js"></script> - A CSS boilerplate to initially hide the content until AMP is loaded.
<style amp4email-boilerplate>body{visibility:hidden}</style> - The style section in the Head has to have
amp-customparameter. - We can't use embedded images in our template.
- We can't use
<img>tags at all. Instead of it, we have to use<amp-img>tags.
You can read in more detail in the AMP documentation.
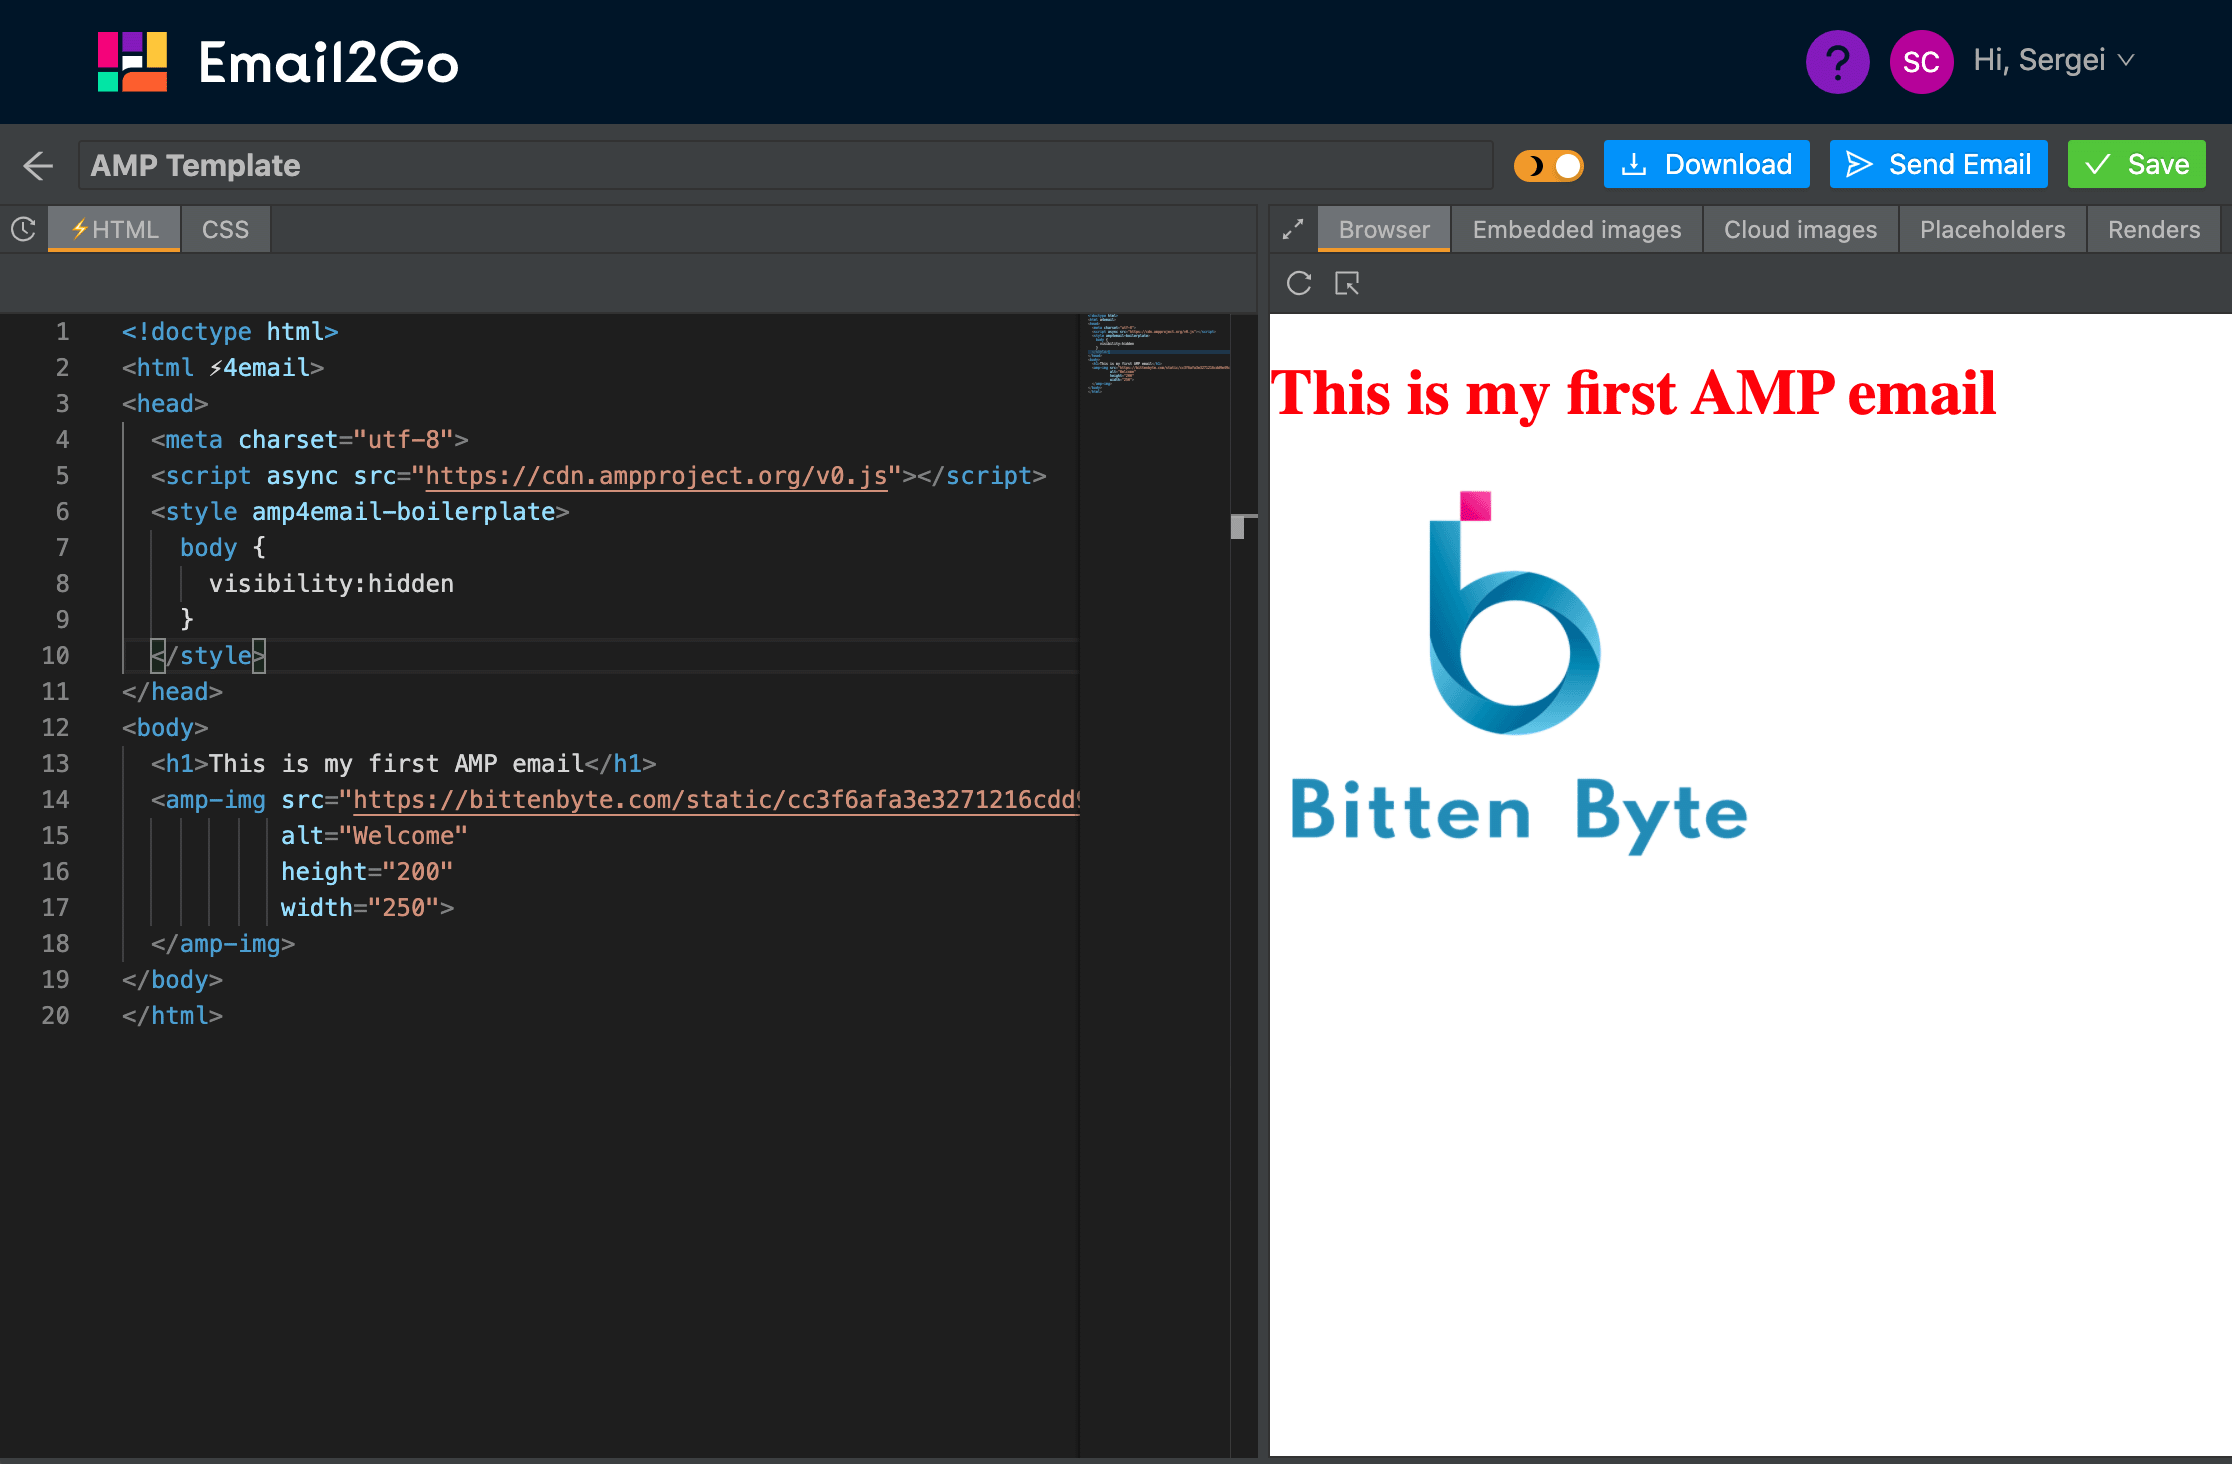
So, let's create our first AMP email template. For this experiment,
I'm going to use the free HTML email template builder by Email2Go. I'll put a title and a
picture into the <body> section.
<!doctype html>
<html ⚡4email>
<head>
  <meta charset="utf-8">
  <script async src="https://cdn.ampproject.org/v0.js"></script>
  <style amp4email-boilerplate>
    body {
      visibility:hidden
    }
  </style>
  <style amp-custom>
    h1 {
      color: #ff0000;
    }
  </style>
</head>
<body>
  <h1>This is my first AMP email</h1>
  <amp-img src="https://bittenbyte.com/static/cc3f6afa3e3271216cdd9e49c6d14dec/bc8e0/bittenbyte_logo_color.png"
           alt="Welcome"
           height="200"
           width="250">
  </amp-img>
</body>
</html>
Let's check how it looks in different browsers using the Email template testing tool. Also, you can send this template to your email at Gmail or Outlook.com and make sure that everything is configured correctly.
Email2Go supports AMP technology, that's why we can remove our
custom-style tag from the <head> and put all styles into the CSS tab. In this case, we don't need to scroll up and down every time when we need to make changes in the styles.
Everything works well. Now I'm going to try the amp-carousel component.
It displays multiple similar pieces of content along a horizontal axis. For this, I have to add a required
script in the <head>:
<script async custom-element="amp-carousel" src="https://cdn.ampproject.org/v0/amp-carousel-0.1.js"></script>Then I'll create a carousel container and put the series of images inside it. If you remember I can't use embedded images. I'll upload necessary pictures into the Cloud using the "Cloud images" tab.
  <amp-carousel width="600" height="400" layout="responsive" type="slides" loop autoplay delay="3000">
    <amp-img
      src="https://cloud1.email2go.io/202cb962ac59075b964b07152d234b70/cf63b8dadbe96c5b71260a16a39c0b9847b1064380b488f50bdabedc7a2823a5.jpg"
      width="600" height="400"></amp-img>
    <amp-img
      src="https://cloud1.email2go.io/202cb962ac59075b964b07152d234b70/358d2cc821eb0d6f9b7ce8a32a7bd9f82e2b595bfb40dd5739be634fd3df2bd2.jpg"
      width="600" height="400"></amp-img>
    <amp-img
      src="https://cloud1.email2go.io/202cb962ac59075b964b07152d234b70/72d518bc18e121ad097630ff5e65b91c25550d309395b22a55943c00fd8357df.jpg"
      width="600" height="400"></amp-img>
  </amp-carousel>
Can you imagine? I wrote a couple of lines of code and got such an amazing result!
I recommend you to read more about all possible AMP components and their properties here.
How to use the amp-form in AMP email templates
Of course, responsive images, carousels, and sidebars can improve
our email templates. But nothing beats the power of amp-form.
In my humble opinion, supporting HTML forms is the best thing that has
happened with emails over the past 20 years. It gives us a great
opportunity to get client feedback from our emails directly. Just imagine,
we don't need to ask anyone to visit our website or follow the link for
confirming the email address. People can do all of these in the email
directly. I can't wait when all email systems start supporting AMP.
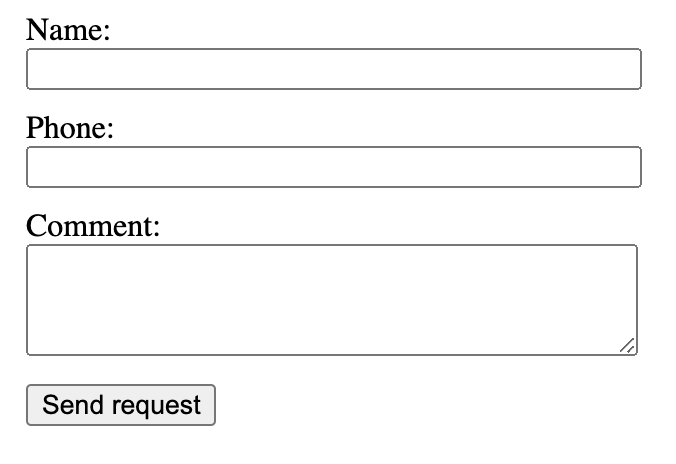
Let's create a simple form in our template. For this experiment,
I'm going to use two components – amp-form and amp-mustache. I'll add needed scripts
in the <head>:
<script async custom-element="amp-form" src="https://cdn.ampproject.org/v0/amp-form-0.1.js"></script>
<script async custom-template="amp-mustache" src="https://cdn.ampproject.org/v0/amp-mustache-0.2.js"></script>
And put this code into the <body>:
<form method="post" action-xhr="https://email2go.io/testrequest/">
    <fieldset style="border: none">
      <label>
        <span>Name:</span><br/>
        <input type="text" style="width: 300px" name="name" required>
      </label>
      <label>
        <span>Phone:</span><br/>
        <input type="text" style="width: 300px" name="phone" required>
      </label>
      <label>
        <span>Comment:</span><br/>
        <textarea style="width: 300px; height: 50px" name="description"></textarea>
      </label>
      <input type="submit" value="Send request" class="button">
    </fieldset>
    <div submit-success>
      <template type="amp-mustache">
        Thanks {{name}}! Your request has been sent!
      </template>
    </div>
    <div submit-error>
      <template type="amp-mustache">
        Request failed!
      </template>
    </div>
  </form>
Also, I'll use these styles for improving the appearance:
label {
    display: block;
    margin-bottom: 10px;
}
This code is very simple and doesn't need much explanation.
I used form fields as I do in regular HTML.
I created two <div> layers
with submit-success and submit-error
properties for displaying the results of the action.
The amp-mustache component provides me with an
opportunity to use "mustache placeholders."
The {{name}} placeholder will be replaced with
the name value from the server response.
Also, I'd like to hide the form fields if I get a successful result from the server. For this purpose, I'll add the next CSS selector in the styles:
form.amp-form-submit-success fieldset {
    display: none;
}
Do you agree that all this is very simple and clear? No?
I anticipate your complaints: what is the action-xhr="https://email2go.io/testrequest/"
in the <form> tag? How can we handle requests
on the server-side? Just relax and read the next paragraph.
How to get data from an amp-form at the PHP server
I use PHP just because I have access to a public PHP server with a valid TLS certificate. You can use any server technology.
I'm going to get the data from the form I created in a previous
paragraph. This is not unusual, all information is contained in
three variables: $_POST['name'], $_POST['phone'], and $_POST['description'].
The amp-form expects the response with
the 'name' value in JSON. Let's do it:
header("Content-type: application/json");
$out = array(
    'name' => $_POST['name'],
);
echo json_encode($out);
Now if I try to submit the form from the "Browser" tab of Email2Go, I will get what I expected. But this solution will not work if I submit this form from Gmail or Outlook.com. The thing is, Gmail and Outlook.com don't allow you to send requests from email to the server directly. They proxy all requests through their services and check valid headers of responses. It means, our server has to send correct headers and have a valid TLS certificate. The URL of the request has to start from "https://". More information about it can be found here. I’ll just provide you with my simple PHP script:
<?php
if(!empty($_POST)) {
    header("Content-type: application/json");
    header('Access-Control-Allow-Origin: '.$_SERVER['HTTP_ORIGIN']);
    header('AMP-Access-Control-Allow-Source-Origin: '.$_GET['__amp_source_origin']);
    header('Access-Control-Expose-Headers: AMP-Access-Control-Allow-Source-Origin');

    //Do something with $_POST['name'], $_POST['phone'], $_POST['description']

    $out = array(
        'name' => $_POST['name'],
    );
    echo json_encode($out);
}
If you want to reject the request and notify a user about
it using <div submit-error><template type="amp-mustache">{{message}}</template></div>, you just need to send an HTTP response code
other than 2xx. For example:
http_response_code (406);
$out = array(
'message' => 'I\'m sorry, we can\'t accept your request.',
);
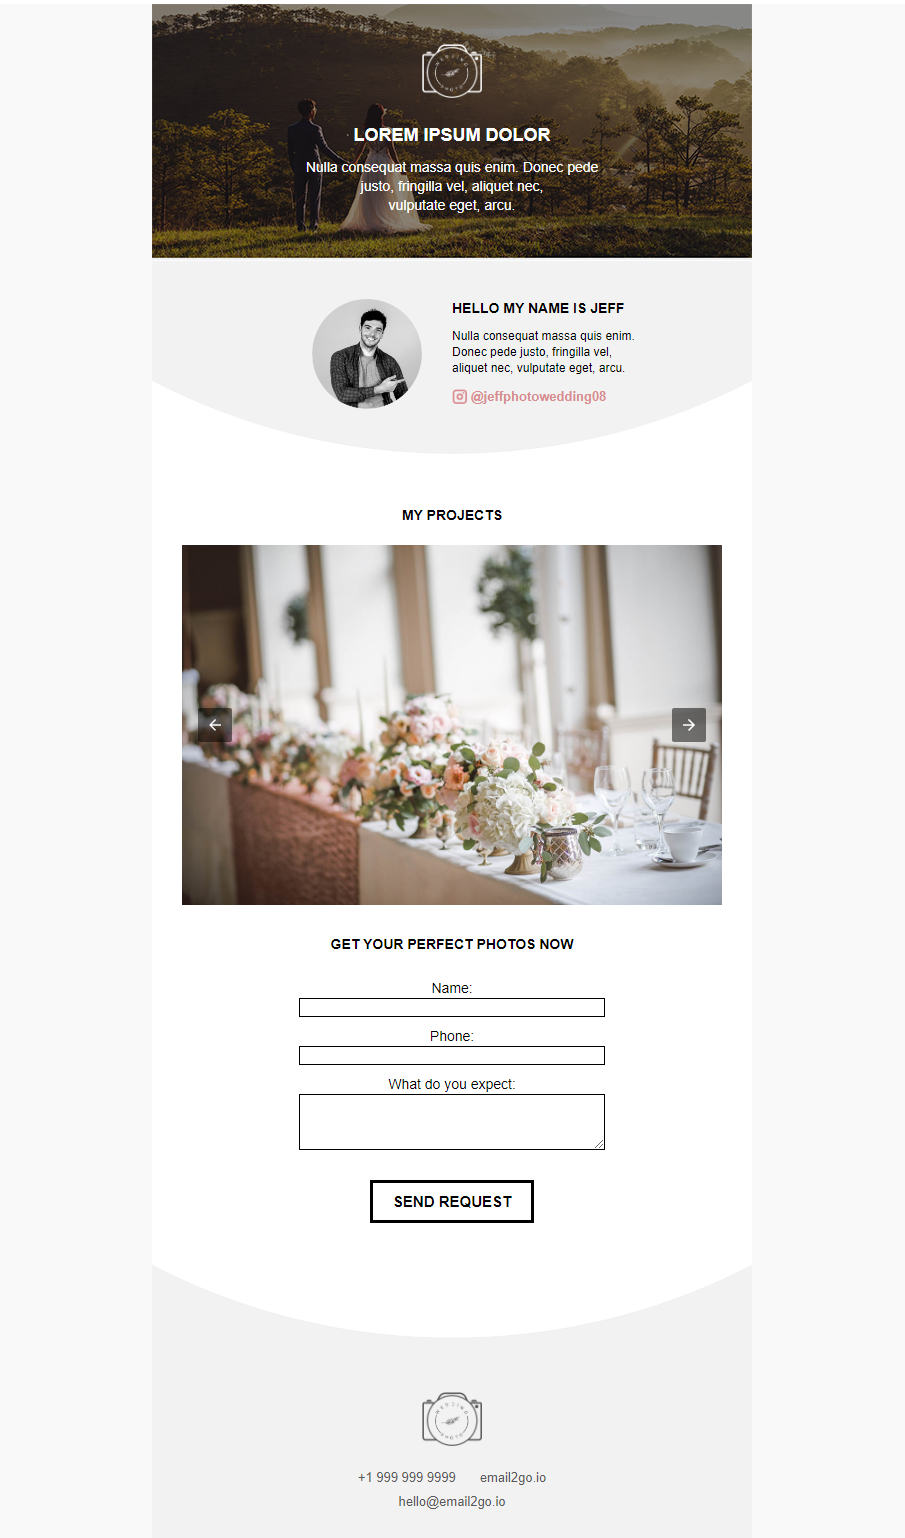
echo json_encode($out);This is all that you need to know to start creating AMP email templates. Also, I recommend you research my AMP template at the Free collection of Email2Go. For this, open your Projects > Click "New Project from Template" button > Find the "AMP Wedding photographer" template at the "APM templates" section. This template and others are absolutely free for individual and commercial use.
09/18/2020 UPDATE: Outlook.com, who has worked with this technology, announced that from October 1, 2020, it will stop supporting AMP emails.